Search This Blog

Wednesday, April 28, 2010

Successes, scraps and lost felafels

When, like me, you cook a lot, not everything falls into the 'spectacular success' category of recipes that you know you'll be making over and over again. Quite the opposite really, which is why it's pretty exciting when I do come across those rare combinations of ingredients and technique that demand instant addition to the never-to-be-lost-scraps-of-paper collection which regularly gets shuffled between my desk, kitchen, and lounge room table (and sometimes gets lost...if I can find the fresh pea felafel recipe I made a few months ago out of a magazine published around the same time, but that I can't for the life of me remember the title of or where I put it, I will actually skip to the kitchen to make it again, and you will all be hearing about it).

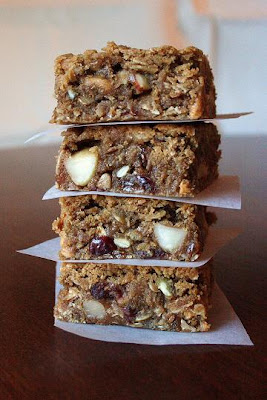
Today's recipe was not destined to be of the spectacular variety, but it certainly wasn't bad and with a bit of work might even make it a little further up the ranks, so I thought I would share it anyway. It's another contender marked off the list in my endless quest for the perfect muesli slice, and although it doesn't fit my picky criteria on account of being a bit too cakey, I did quite like it in a fudgy, squishy, oaty kind of way. The one thing I would definitely keep in mind if I make it again (and I may) would be to reduce the sugar as it was quite sweet. I used my own Toasted Nut Crunch Muesli (which I would certainly encourage you to make, and not only for purposes of this recipe!) which does have brown sugar in it already, so I guess if you wanted to use an untoasted/unsweetened muesli perhaps you could get away with using the full amount of sugar.

The bare bones of the oat cake base for this come from a recipe out of Jo Seagar's The Cook School Recipes, for White Chocolate Caramel Oat Cake (obviously minus the white chocolate and caramel - God knows what possessed me to set to work with the least appealing-sounding food of the three on that list, given the choice!). I picked up Jo's book in New Zealand last year, and while I'd suggest she's probably not that well known to the rest of the world, she is known throughout New Zealand, and reasonably well in Australia, for her cookery school Seagars and her down-to-earth approach to delicious country-style food. I have long been an admirer and am really enjoying cooking from the book - particularly the sweet options, which are the sort of things your Nanna might make if she were a hip, modern Nanna (like mine, I am lucky to say).

Back to the cake, though. It's ridiculously easy - you just throw everything in a bowl, stir it around until it's mixed, squash it into a tin and you're away! And let's face it, if it's not the absolute best recipe you've ever made, it'll be far from the worst, full of faux-goodness from the muesli, and give you something to work towards for the next time you make it. They can't all be winners, can they?

Muesli Slice

makes 16 large-ish squares, or more if you decide to cut them smaller

1 and 1/2 cups wholemeal plain flour

3/4 cup white plain flour

1 tsp baking powder

1/2 tsp bicarbonate soda (baking soda)

2 and 1/4 cups toasted muesli
As mentioned above, I used my homemade muesli for this, although you could use whatever you like, even untoasted if you are prepared for the end result to be a bit less nutty and toasty tasting. The one thing I would advise is that if your muesli doesn't contain much fruit or nuts, add some extra into it or your slice will be pretty boring.

1/3 cup dessicated coconut

1 and 1/4 cups dark brown sugar
I would definitely reduce this to a cup, or maybe even 3/4 cup to make things less sweet, unless your muesli is unsweetened or you have a real sweet tooth.

2 large (59g) eggs, lightly beaten

250g unsalted butter, melted

Preheat oven to 180C. Grease and line a 20cm square cake tin or baking tray (I like to line up the sides of the tin to make it easier to get the slice out after baking).

Put all your ingredients into a large mixing bowl and mix thoroughly until combined. Pour the mix into your tin and smooth the surface.

Bake for 30-40 minutes, or until the slice is just cooked in the centre and a skewer tests clean. Don't overbake it - a dry, firm slice is not what you're aiming for here, more like a soft-ish cake. Allow to cool in the tin before cutting into slices or squares (I put the whole thing in the fridge overnight, which made it much easier and cleaner to cut).
Wednesday, April 7, 2010

Chickpeas and Spinach


This is not a dish that will win awards for its attractive presentation. In fact, as you can probably see by today's photo, I found it hard to present this little number in any way even beginning to resemble how good it actually tastes. That, and the fact that I made it to take to lunch at a friend's house meant I was trying to speedily point my camera at it while figuring out how to get it into the car and across the city while it remained hot and in the bowl (result: still hot but showing definite signs of 'car spillage' by the time it reached its destination. I don't think anyone minded).

With this recipe, for once, I followed every instruction and almost every ingredient to the letter. You see, this is not just any chickpea and spinach dish I vaguely threw together from a magazine - this, my friends, is the chickpeas and spinach from the MoVida cookbook I purchased after we ate this very dish in the restaurant.

It was almost two years ago that we visited friends in Melbourne and took them to MoVida for dinner as a thankyou for letting us stay with them. It was fabulous, and we have since been back with the same friends for another go round with the excellent food and attentive, friendly service. And although I bought the book the first time we went, and there are a lot of things in it I've wanted to make, this recipe is the standout. Odd, I know, but it's one of those dishes you just have to eat to understand. Odder still is the fact that it's taken me this long to make it, given that it's been discussed many a time in our house and with our Melbournite friends since we tried it. Put it down to fear, maybe, that my version would fall short of the restaurant's, or that it wouldn't be as good without the atmosphere of MoVida to eat it in.

Happily, I can report that my fear was unfounded on both counts and the recipe I detail below is almost word for word the one printed in the cookbook, as I really don't see anything that could be changed to make it better. There's a bit of forward planning involved to soak and cook your chickpeas, and to make the bread 'picada' which thickens and flavours everything, but it really is worth it, and you can use leftovers of both the chickpeas and the picada to make other dishes (sounds weird, but I stirred some picada through a chicken, pumpkin and ricotta mixture I made as lasagne filling and it thickened up the mix perfectly as well as adding a little extra something to the flavour).

So, now that all the talk of 'blogging the chickpeas and spinach' has finally come to fruition I am glad to be able to share it here and I sincerely hope you'll give it a go.

Chickpeas & Spinach Slowly Cooked with Spices and Sherry Vinegar
from MoVida - Spanish Culinary Adventures
by Frank Camorra and Richard Cornish

Serves around 6 as a side-dish, or 3-4 as a light dinner with some crusty bread

Following is Frank Camorra's introduction to the recipe from the book, which I have included as it has a lovely story attached and will hopefully give you yet one more reason to make it!

"I learned this dish from my Aunty Pepa in Andalusia. My mum has always made this rich spinach dish, but I suppose I didn't value her cooking until I went back to live in Spain and watched Aunty Pepa pound the cooked chickpeas and add some bread picada to thicken the cooking juices. This recipe is packed full of flavour and always makes me feel good after I have eaten it. Sometimes Aunty Pepa added salt cod or poached eggs to the bubbling sauce at the last minute. At MoVida we do a simpler version, which is one of our most popular dishes. We serve hundreds of portions per week, going through tens of kilos of chickpeas and scores of boxes of spinach".


20g/1tbs butter

1 clove garlic, finely chopped

600g (1lb 5oz) spinach leaves, washed and large stems picked off

300g (10 and 1/2 oz) cooked chickpeas (instructions below)
Please, please soak and cook your own chickpeas for this - tinned are fine for a lot of things, but here you will notice the difference.

400ml chickpea cooking liquid (reserve when you drain the chickpeas at the end of cooking)

125g (4 and 1/2 oz) bread picada (recipe below)

1 1/2 tsp Spanish sweet paprika (not the smoked paprika)

1tsp ground cumin
This was one of my two changes - I used a touch more cumin as I love it.

2tbs sherry vinegar
My other change, as I had no sherry vinegar, was to use a lovely pear vinegar that I buy from Margaret River's Berry Farm.

Melt the butter in a large, deep pan over medium heat. Gently saute the garlic for one minute then add the spinach. Using a pair of tongs, carefully turn the spinach over and over as it cooks until it has wilted down to about half of its original volume. This should take about two minutes.

Increase the pan heat to high, then add the chickpeas and the chickpea cooking liquid. Using the back of a spoon, crush some of the chickpeas into the spinach to bring out the earthy flavour.

After five to ten minutes, mix in the bread picada, letting it soak up the liquid in the pan. Add the paprika, cumin and a generous pinch of salt and mix well.

Reduce the heat to low and cook for five minutes, then add the sherry vinegar and cook for another five minutes, allowing the sauce to thicken to a creamy consistency. Sprinkle with sea salt flakes and serve hot.


How to cook chickpeas:

Again I defer to Mr Camorra, whose detail on cooking one of my favourite pulses has definitely taught me a thing or two. I was previously unaware that chickpeas are particularly sensitive to sudden temperature changes when cooking. This means you should never drop your soaked chickpeas into boiling water to cook them, rather put them in warm water and slowly bring up to the boil, which will avoid them getting tough and chalky. Simple and
brilliant advice.

Dried chickpeas will generally just over double their weight when cooked. I generally do about half a kilo (just under a pound) of dried chickpeas when I am cooking them - although this will give you far more than you need for the above recipe and the picada, they keep for several days in the fridge and can be thrown into all sorts of dishes or blended with tahini, garlic and lemon juice for delicious hommus. To cook, soak 1 part chickpeas to 3 parts warm water overnight (you don't need to put them in the fridge, just cover and stand on your benchtop). Drain and place the chickpeas into a large pan filled with fresh warm water. Bring them to the boil and add a cup of cold water to slow them down at this point. Return to the boil and cook until the chickpeas are tender but not mushy (this will depend on how old your dried chickpeas were - expect anywhere between 40 minutes and an hour and a half). Remove the pan from the heat and let stand until it reaches room temperature. Drain and reserve the cooking liquid (it can be used much as any vegetable stock would be, although remember it won't be salty at all). Store both the chickpeas and the cooking liquid, covered, in the fridge for up to a few days.


Bread Picada
from MoVida - Spanish Culinary Adventures
by Frank Camorra and Richard Cornish

80ml (2 and 1/2 fl oz) extra virgin olive oil

4 cloves garlic, unpeeled

4 slices 2-day-old firm crusty bread

110g (3 snd 3/4 oz) cooked chickpeas (instructions above)

2-3 tbs cooking liquid from chickpeas

sea salt

Heat the olive oil in a frying pan and gently fry the garlic in its skins for 30 seconds. Add the bread slices and season with salt while in the pan. Fry the bread for around two minutes each side, or until golden. Remove the bread and the garlic from the pan and drain on paper towel. Allow to cool a little, then break the bread into 5cm (2 inch) pieces. Peel the garlic and discard the skins.

Pound the garlic a little using a mortar and pestle (or pulse in a food processor), then add the bread, piece by piece. Pound or blend until it forms medium to large sized breadcrumbs, about 2-5mm (1/16-1/4 inch).

Add a few of the chickpeas, the chickpea cooking liquid and some salt to taste. Mix until the chickpeas begin to break up.

Continue adding the rest of the chickpeas, feeling free to add a little more cooking liquid, and making sure you don't overblend the mix. It should remain fairly coarse - the consistency of a rough-looking mashed potato or stuffing for a chicken.

Bread picada will keep, sealed in an airtight container, in the fridge for a few days.