Search This Blog

Showing posts with label baking. Show all posts

Wednesday, April 28, 2010

Successes, scraps and lost felafels

When, like me, you cook a lot, not everything falls into the 'spectacular success' category of recipes that you know you'll be making over and over again. Quite the opposite really, which is why it's pretty exciting when I do come across those rare combinations of ingredients and technique that demand instant addition to the never-to-be-lost-scraps-of-paper collection which regularly gets shuffled between my desk, kitchen, and lounge room table (and sometimes gets lost...if I can find the fresh pea felafel recipe I made a few months ago out of a magazine published around the same time, but that I can't for the life of me remember the title of or where I put it, I will actually skip to the kitchen to make it again, and you will all be hearing about it).

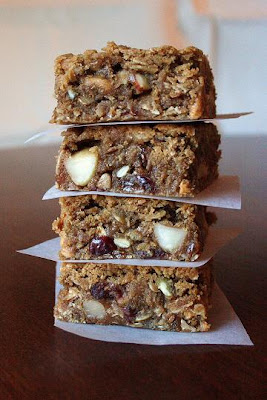
Today's recipe was not destined to be of the spectacular variety, but it certainly wasn't bad and with a bit of work might even make it a little further up the ranks, so I thought I would share it anyway. It's another contender marked off the list in my endless quest for the perfect muesli slice, and although it doesn't fit my picky criteria on account of being a bit too cakey, I did quite like it in a fudgy, squishy, oaty kind of way. The one thing I would definitely keep in mind if I make it again (and I may) would be to reduce the sugar as it was quite sweet. I used my own Toasted Nut Crunch Muesli (which I would certainly encourage you to make, and not only for purposes of this recipe!) which does have brown sugar in it already, so I guess if you wanted to use an untoasted/unsweetened muesli perhaps you could get away with using the full amount of sugar.

The bare bones of the oat cake base for this come from a recipe out of Jo Seagar's The Cook School Recipes, for White Chocolate Caramel Oat Cake (obviously minus the white chocolate and caramel - God knows what possessed me to set to work with the least appealing-sounding food of the three on that list, given the choice!). I picked up Jo's book in New Zealand last year, and while I'd suggest she's probably not that well known to the rest of the world, she is known throughout New Zealand, and reasonably well in Australia, for her cookery school Seagars and her down-to-earth approach to delicious country-style food. I have long been an admirer and am really enjoying cooking from the book - particularly the sweet options, which are the sort of things your Nanna might make if she were a hip, modern Nanna (like mine, I am lucky to say).

Back to the cake, though. It's ridiculously easy - you just throw everything in a bowl, stir it around until it's mixed, squash it into a tin and you're away! And let's face it, if it's not the absolute best recipe you've ever made, it'll be far from the worst, full of faux-goodness from the muesli, and give you something to work towards for the next time you make it. They can't all be winners, can they?
Muesli Slice

makes 16 large-ish squares, or more if you decide to cut them smaller

1 and 1/2 cups wholemeal plain flour

3/4 cup white plain flour

1 tsp baking powder

1/2 tsp bicarbonate soda (baking soda)

2 and 1/4 cups toasted muesli
As mentioned above, I used my homemade muesli for this, although you could use whatever you like, even untoasted if you are prepared for the end result to be a bit less nutty and toasty tasting. The one thing I would advise is that if your muesli doesn't contain much fruit or nuts, add some extra into it or your slice will be pretty boring.

1/3 cup dessicated coconut

1 and 1/4 cups dark brown sugar
I would definitely reduce this to a cup, or maybe even 3/4 cup to make things less sweet, unless your muesli is unsweetened or you have a real sweet tooth.

2 large (59g) eggs, lightly beaten

250g unsalted butter, melted

Preheat oven to 180C. Grease and line a 20cm square cake tin or baking tray (I like to line up the sides of the tin to make it easier to get the slice out after baking).

Put all your ingredients into a large mixing bowl and mix thoroughly until combined. Pour the mix into your tin and smooth the surface.

Bake for 30-40 minutes, or until the slice is just cooked in the centre and a skewer tests clean. Don't overbake it - a dry, firm slice is not what you're aiming for here, more like a soft-ish cake. Allow to cool in the tin before cutting into slices or squares (I put the whole thing in the fridge overnight, which made it much easier and cleaner to cut).

Friday, March 5, 2010

Easter prettiness


I love holiday-themed foods. Being inspired by things I find online, in magazines and in my beloved cookbooks always encourages me to push my own creative boundaries and try my hand at seasonal goodies to be shared with friends and family.

A staple of my gift-giving (and my entrepeneurial pursuits!) for as long as I can remember has been decorated gingerbread cookies - rarely does a holiday or special occasion go by that I don't produce at least a couple of batches of these spicy cookies, sometimes decorated with rolled fondant, but most often iced with a royal icing which allows me to change the texture according to whether I want 'floodwork' pieces (such as the ones above) or delicately piped scrolls, swirls, letters or patterns. I also adore the lemony tang of this icing against the warmth of the deep spiciness in the cookies.

Given that my new freelance career has, for the moment, left me with a little more time than in previous years, this year I'll be selling some of these gorgeous gingerbread treats to supplement my income and stimulate the creative juices. And as I'll be offering them for sale to the family and friends I also give gifts to, I think it's only fair that I find something different to make as gifts for those people, don't you? So below are a few little inspirations I'm hoping to try my hand at in the next couple of weeks before Easter rolls around:
  • Sugar-sanded marshmallow bunnies over at the Martha Stewart site.
  • Hot cross buns - there are heaps of recipes online, mostly the basic dough is the same, just vary the dried fruits according to your taste. I'll be leaving out the citrus peel but including some dried apricots and maybe some figs, too.
  • The very naughty but very nice-looking Chocolate Caramel Tart from a back issue of my Delicious magazine collection.
  • Another Delicious recipe, the aptly but perhaps strangely-named Easter Salad, which I'll probably serve as a side dish to some kind of barbecued fish. Not so much a gift, unless you count it a gift to be invited to someone's house for dinner (I certainly do!).
  • And while we're on the fish idea, perhaps this Fish with Caper Butter Sauce might be nice too...

What will you be making or serving this Easter?

Tuesday, January 19, 2010

The poor zucchini

I love zucchini (and its little brother, the courgette), but I feel that this humble vegetable suffers from a bit of an image problem. Quietly sitting on the greengrocer's shelves, it sometimes gets overlooked in favour of other, more visually commanding fresh produce (artichokes, beetroots and unusually-shaped pumpkins come to mind as examples). Not in my kitchen, though. I sometimes wonder if I actually overuse zucchini in my cooking, such is its appeal and versatility.

See, the thing is, it's just so agreeable. It's cheap; the flavour is mild and very 'clean'; and the texture is such that it will pick up almost any flavour you choose to throw at it (sweet things included). Also, it's one of those vegetables which lends itself to being eaten raw or cooked.

In the hope of expanding your zucchini-eating horizons, I'm not going to give a single recipe today, more a collection of little ideas which you can incorporate into a wide range of meals. In any given week, I might include 'the zucc' in the following dishes (and more):

Cut into rough chunks and tossed in a touch of olive oil, salt, pepper and perhaps chilli flakes, and roasted alongside a chicken or joint of red meat until melting and browned.

Grated into a bowl, stirred up with other veg (maybe carrots, onions and parsnip), a little flour, egg and some crumbled feta cheese to make fritters.

Sliced roughly into a pan with crispy-fried pancetta, mushrooms, garlic, chilli and a bit of white wine to make a fantastic 5-minute pasta 'sauce' (well, not so much a sauce as a collection of tasty bits to mix through your pasta, but the wine and pancetta fat will give you just enough of a slick to coat everything nicely).

Sliced lengthways, grilled on a barbecue plate and dressed while warm with lemon juice, olive oil, lots of black pepper and the merest hint of sliced garlic - this will keep for days in the fridge and is great warm or cold with just about anything.

Shaved into thin strips and tossed through a salad of leafy greens, bacon, carrot shavings and toasted nuts, with a light vinaigrette dressing.

And, not really last or least, but to finish this particular post on a sweet note, turned into a cake in much the same way as you would with carrots. If you'd like to give it a go, there's a lovely recipe here (I'm not a fan of the raisins/sultanas in it, so I substitute chopped dried apricots and/or dates, which works like a charm).

What's your favourite way to cook or eat zucchini?

Friday, January 8, 2010

Happy 2010 (a few days late)


Usually, the coming of a new year doesn't bring about any big or noticeable changes, apart from requiring me to switch to my new 'Foodies Diary' and remember the right year when I'm writing the date. The finishing of 2009 and starting of 2010, though, is a different story altogether.


2009 was for the most part a year of certainty and solidity. It was the year I got married, and where things both at home and at work were challenging but focussed. Skip the calendar forward, and here we are in a whole new decade. For me, 2010 means a lot more uncertainty and possible 'wobbles' than last year brought - hopefully not at home where newly-married life is going along swimmingly, but definitely on the career front. There is excitement though, mixed in with that uncertainty. Quite a lot of it, in fact. For in a few short weeks, I will be leaving the day job which comfortably pays my bills to venture into self employment as a freelance writer/food stylist/developer.


And herein lies that exhilarating and frightening mix which a new future brings. Will it work? Who knows - I've done my research (and my networking), and things all point in the right direction, but the only way to really know is to try.


So in the interest of countering all that instability, today I'm going to share one of the most certain and comforting recipes I know. The recipe has changed and evolved over the years, but it's the first recipe I can remember making without Mum's help, and it always makes me think of my childhood self standing at the bench with a bowl and a wooden spoon. The feeling of quiet achievement and satisfaction in the kitchen has been with me ever since I managed to weigh, mix and bake this all on my own, so here's hoping it will give you the same pleasure.

Chocolate Cake
makes one 22cm round cake

This cake is not rocket science, and there are really no fancy tricks involved in making it. It is, however, my go-to recipe for chocolate cake as it's incredibly reliable, keeps well for days, and can be just as easily dressed up as a birthday (or even a wedding) cake as it can be sliced and served simply for afternoon tea.

The most important thing for getting that really deep chocolatey richness, I find, is to use a very good quality Dutch-process cocoa powder (in this recipe it's even more important than the quality of your chocolate in giving a good result). My cocoas of choice are either Valhrona or DeZaan.

250g unsalted butter, softened and cut into cubes

150g dark chocolate
I generally use a decent 70% chocolate, however in the past when I've had to make vast quantities of this cake I've kept costs down by using dark cooking chocolate, and it still comes out ok

200g white caster sugar

100g brown sugar

250ml strong black coffee
instant is fine, but by all means use plunger/machine coffee if you have it

100g plain white flour

100g self-rasing white flour

50g almond meal
just use an extra 50g plain flour if you don't have almond meal - the finished cake will be slightly less fudgy but delicious all the same

50g cocoa

2 large (59g) free range eggs, lightly beaten

Preheat your oven to 170C. Grease and line a 22cm round cake tin.

Put the butter, chocolate, sugars and coffee into a medium saucepan and heat gently until the butter and chocolate are melted. Remove from heat and set aside to cool slightly.

While the butter mixture is cooling, sift the flours, almond meal and cocoa into a medium bowl and mix to combine.

Whisk the eggs into the cooled butter mixture, then stir in the flour mixture until combined and fairly smooth (don't overmix it or your cake will be tough).

Pour the batter into your prepared tin and bake for 35-45 minutes or until the cake tests clean with a skewer. Cool cake in tin for 10 minutes, then turn it out onto a wire rack to cool completely.

You can either dust the cake with icing sugar for serving, or make a simple icing by beating 150g butter with 50g cocoa, 300g icing sugar and enough warmed milk to give a spreadable consistency.

This cake will keep well for up to a week in the fridge if sealed in an airtight container, and in fact tastes best if you can leave it for a day or two before eating. Just bring it out of the fridge and let it come to room temperature before serving.

Monday, December 14, 2009

All about the chocolate

Several months ago, I made some truly delicious little treats for a party. We were giving take-home boxes of goodies to our guests and these delights formed part of the offering.


Everyone loved them, and a few guests requested the recipe. And then, when I went to dig up the scrap of paper I had the recipe written on, it was gone. Gone somewhere into the depths of my home office, and certainly not where I swear I had left it (among the many other 'recipe paper scraps' and clippings, obviously - where else would I put it?).


So the other day I was cleaning out a few bits and pieces from said home office, where the towers of books, papers and random miscellany had become, lets say, mountainous, and lo and behold, there it was. Quietly sitting atop a file of old accounts and business paperwork, and very definitely NOT with the countless other food-related clippings I hoard like gold dust for the distant-future time when I will collate, file and organize every recipe I own.


Nonetheless, I think this little gem was just waiting for the right time to show itself again, and with Christmas baking requirements entirely upon us, these Dark Chocolate Hazelnut Bites might just be the thing you've been needing to add to the season's repertoire. They are simple (providing you have a food processor and a stand-mixer), rich and present beautifully in little beribboned boxes, either alone or as part of a holiday baked goods selection.


Oh, and now that I've put the recipe up here, I need not worry about losing it again, and nor will you!


Dark Chocolate and Hazelnut Bites
makes a few dozen, depending how large you roll them

I would like to credit this recipe to someone, but I cannot remember where the original came from, only that before I adapted it, it contained almonds rather than hazelnuts, and rum instead of Frangelico. I am sure that either way will work just as beautifully.


240g dark chocolate, chopped
As the title of the post suggests, it really is all about the chocolate - you will very much taste the chocolate in the finished cookies, so make sure you use something that you really enjoy eating. I went with a Barry Venezuelan 72% couverture.


50g unsalted butter


45ml Frangelico or other hazelnut flavoured liqueur


2 large (59g) eggs, at room temperature


1/3 cup golden caster sugar
you could use normal caster sugar at a pinch


1 heaped cup hazelnuts, toasted
Best way to do this is pop them single-layer on a tray in a 180C oven for 8-10 minutes until fragrant, then wrap them in a tea towel and rub most of the skins off while they're still warm. You can use pre-roasted nuts however they won't give as fresh a taste to the finished cookies.


1/2 cup plain white flour


1/2 tsp baking powder


a pinch of salt


white caster sugar and icing sugar for coating the cookies
Mine needed somewhere between half a cup and a cup of each sugar.


Melt the chocolate, butter and Frangelico together in a metal or glass bowl rested over a saucepan of simmering water (don't let any water or steam get into the chocolate mix or it will seize and you'll need to start again).


In a stand mixer, beat the eggs and sugar together until they are very pale and thick (around 5 minutes on medium speed). Slowly mix in the melted chocolate mixture.


In a food processor, blend the nuts until ground finely but not a paste. Tip the nuts into a large mixing bowl and stir in the flour, baking powder and salt.


Stir the nut mixture into the chocolate/egg mixture until well combined, then cover and chill the mix for a couple of hours or until firm (I leave mine overnight and it doesn't hurt the mix at all).


When you're ready to bake, line a couple of flat baking trays or cookie sheets with baking paper and preheat the oven to 170C. Fill a bowl with white caster sugar for rolling the cookies in.


Roll heaped teaspoons of mixture into balls, then roll each ball in the sugar before placing on the trays, leaving 2-3cm between each cookie.


Bake for 12-15 minutes - the cookies are done when they are set at the edges but still a little bit soft at the centre (don't overbake them or you'll have dry, crumbly cookies instead of chocolatey, tender ones).


Let the cookies cool slightly on the trays before filling another bowl with the icing sugar and rolling each warm cookie in it to coat generously. Over a number of days (if they last that long!), the icing sugar coating may start to look a bit 'greasy' - if this bothers you, just re-roll the cookies in some more icing sugar before you serve them.


These will keep, sealed up somewhere cool (but not the fridge), for a couple of weeks easily.

Wednesday, July 30, 2008

The Aftermath


Once again, it's been a while. My sincerest apologies to those of you who keep asking when the next well-overdue post is coming! Whilst my intentions are good, there have been some major life upheavals to contend with over the past couple of months which have prevented regular blogging. Things look set to return pretty well to normal over the next few weeks, albeit a new kind of normal courtesy of my new job. Aah, life.

Anyway, this new kind of normal will hopefully include a lot more blogging and a course on how to properly use my camera, so that you all can see the true beauty of some of my kitchen experiments!

And as for today's kitchen experiment, well, it didn't go too badly indeed, as you can see by the photo above. Unfortunately for you, I neglected to take pictures of the 'before' scene so you'll just have to make do with the recipe and trust me that it's good. Real good.

And just for Nic and Sal's benefit: I see no harm at all in adding to this some figs lightly poached in a sugar syrup with a slug of port or dessert wine - go all out!

Warm Almond Cake with Lemon Curd Icecream

adapted from recipe in 'Cocina Nueva - the new Spanish kitchen', by Jane Lawson

Cake:

200g unsalted butter, softened

1tsp vanilla extract or paste

2tsp finely grated lemon zest

310g icing sugar

4 eggs, separated

125ml milk

400g ground almonds (always better if you can grind them yourself but the bought pre-ground ones are fine)

Preheat oven to 160C, and line and grease a 23cm round springform tin.

Beat the butter, vanilla, zest and 250g of the icing sugar in an electric mixer until pale and creamy. Add the egg yolks one at a time, beating well after each addition. Add the milk and ground almonds and mix to combine.

Beat the egg whites with a pinch of salt and the remaining icing sugar until firm peaks form. Fold a large spoonful of this through the almond cake batter to combine, then carefully fold through the rest. Spoon gently into the tin and smooth the top.

Bake for about 30 minutes, then cover the top of the tin with foil and bake for a further 20-30 minutes or until a skewer tests clean in the centre of the cake. Your finished cake will be quite dark on the outside but should be gorgeously moist and a bit squidgy in the centre. Cool slightly in the tin, then turn out and serve warm, with the lemon curd icecream on the side.


Lemon Curd Icecream

This is ridiculously easy providing you have some decent lemon curd (lucky me having made a huge amount of it last week with all the lemons falling off Mum's tree!). If there are no lemons, or you're feeling time-poor, by all means buy your curd - just don't skimp on the quality, as you will taste it in the finished product. And, obviously, make this a day ahead of baking your cake.

600ml thick cream, chilled

about 350-400ml good lemon curd, chilled

Mix the lemon curd and cream together (adjust the amount of curd to taste - you want something a bit sweeter than you're after as the coldness of the icecream will dull the sugar a bit).

If you have an icecream maker, put the mixture in and churn according to your machine's instructions. Otherwise, pour the mixture into a shallow tray, cover and freeze for a few hours until icy around the edges. Working quickly, transfer to the bowl of an electric mixer and beat until smooth. Return to the tray and refreeze. Repeat this step three times, then transfer the mixture to an airtight container covered with a piece of baking paper and a lid.

Monday, June 23, 2008

Good adaptations


I, like many fellow cooks, have a bit of a penchant for adapting recipes to suit my mood, or, perhaps more often, what's in my pantry. In a way it's what cooking's all about - taking various ideas, methods and ingredients and combining them in your personal style to create your own recipes.


Having the confidence to cook this way is truly one of the great joys of the kitchen for me. I can remember just starting to cook as a child, and following every recipe with great concentration, and an emphasis on getting each ingredient and step exactly as its author described. Then, over time, I became a bit more confident and liberal with my food, such that I now know (most of the time, anyway!) what I can substitute or change about a recipe which will make it suit me better.


It's worth adding, however, that this doesn't always work, even if you are experienced - some things don't take kindly to being played with (bread and a lot of baked goods, for example, and confectionery), and others just don't quite turn out the way you'd hoped. I have, needless to say, had some spectacular failures as well as amazing successes!


The two recipes that follow today, though, are great examples of recipe adaptation: the first, a Nigel Slater-inspired meatballs dish; and the second a gorgeous yoghurt cake made a bit special with the use of leftover poached quinces and caramel sauce to turn in into a fabulously sticky upside-down cake.


As promised in a recent post, I've given Nigel Slater's Appetite a bit of a workout and thought I'd share my version of the meatballs recipe from the book. Mr Slater calls for pork mince as the basis for these little delights, and while I only had beef, I thought they were worth a try...good thinking me! Perhaps a little garlicky for my liking, but that could be easily rectified next time, and my scepticism about there not being any breadcrumbs in the mixture proved to be unfounded. The adapted recipe is below.


As for the cake, I've used this recipe for yoghurt cake a few times and it's worked like a dream in every incarnation, including just the plain version with lemon syrup (which is how it appears in Sweet Food, a little Murdoch Books creation from the Chunky Food series). This time, I had some wine-poached quinces in the fridge, along with a little dribble of caramel sauce, so used these to line the base of my tin and poured the cake batter over the top. Bake, turn out, and voila! A sticky Caramel-Quince Upside Down Cake. This kept Chris and I going for dessert (and, I admit, breakfast on a couple of occasions) for about 5 days. And happily it was almost as good on that last day as it was straight out of the oven. No small feat for a cake, and I suspect it had a lot to do with the moistness that the yoghurt adds.


Do try them, either as I've written, or add your own twist and see what you can come up with. As for me, I think my next yoghurt cake will be split and filled with lemon curd; and the meatballs will be made with pork mince and maybe a little ricotta cheese...happy cooking.

Midweek Meatballs
(adapted from the 'really juicy, spicy meatballs' in Appetite, by Nigel Slater)


I loosely based my recipe on the European version described in the book, using the following:

a decent handful of pancetta, sliced into lardons

500g beef mince

2 cloves garlic, crushed

zest of 1 lemon

2 small red chillies, finely chopped

a good pinch of freeze-dried oregano (MUCH better than normal dried herbs, try them if you can find them at your local gourmet store!)

salt and pepper

Mix all ingredients together, trying not to overmix. Cover and refrigerate for 30 minutes to firm the mixture slightly, then roll into small meatballs (about a tablespoon of mixture for each one is good).

Heat a little olive oil in a frypan over medium heat and brown the meatballs on all sides, then turn heat to low and finish cooking through.

Serve your meatballs hot, with any of the following:

  • dropped into a chilli-spiced chicken broth with a few soba noodles and some Asian greens
  • briefly tossed with a jar of tomato-based pasta sauce and perched atop a mound of spaghetti
  • with mash and steamed vegies
  • with tiny pasta shapes or rice (try deglazing your meatballs pan with a touch of white wine and throwing the pasta/rice around in this reduced mixture to coat & flavour), parmesan cheese and steamed broccolini - as per today's photo


Caramel-Quince Upside Down Cake

(adapted from the Yoghurt Cake with Syrup from Murdoch Books' Sweet Food)

8-10 pieces poached quince, drained of any syrup

200ml pre-bought caramel sauce, or you could make it yourself if you're feeling industrious (NOT that nasty fake caramel ice cream topping, please!)

185g softened unsalted butter

250g caster sugar

5 eggs, separated

250g plain Greek-style yoghurt

2tsp grated lemon zest

1/2tsp vanilla extract

280g plain flour

2tsp baking powder

1/2tsp bicarbonate soda

Preheat oven to 180C. Grease and line a 24cm round springform tin.

Spread the caramel over the base of your lined tin, then top with the quince pieces, arranging in neat circles so they present nicely when you turn out your finished cake. Set aside.

Beat butter and sugar until light and creamy. Add egg yolks gradually, beating well to incorporate. Stir in the yoghurt, zest and vanilla. Fold in the flour, baking powder and bicarb.

Whisk egg whites until stiff, then fold into the cake mixture. Spoon carefully into the prepared tin, being careful not to move the quinces too much, and bake for 50 minutes or until a skewer tests clean. Cool in the tin for 15-20 minutes, then turn out onto a serving plate so any sauce/juice runs down the sides of the cake.

Serve warm or at room temperature with double cream.

Tuesday, May 13, 2008

Brownies...with Oreos?

I did promise in my last post to enlighten you regarding some purchases I made in Melbourne... Books for Cooks is the sort of store any cookbook lover wishes was right around the corner, particularly if you're a complete junkie like me. So, knowing that they're not just around the corner, it was with remarkable restraint that I left the store with only 4 new titles after a happy hour or so browsing the shelves (I will add here, however, that the restraint I speak of had far more to do with flight baggage limits and budget constraints than good sense).

As the picture demonstrates, my current cooking trend of 'all things chocolate' dominated on the day, although the Nigel Slater and Hugh F-W additions also made it in on the basis that I've had my eye on both books for some time...if you've never read/cooked with a book from either of these UK-based masters, well, where have you been? Both men are brilliant writers and dedicated foodies, and place strong emphasis on the origins and quality of what we eat - issues which are governing more and more of the foods I choose to buy and cook with.

I've gotten off track, though...Nigel and Hugh's books will almost certainly be featured in future posts (when I've had more time to go through them in detail), but today's recipe comes from one of my other 'newies', Lisa Yockelson's Chocolate Chocolate.

I'd like to state for the record that the purchase of this book did cause me some angst due to its 'American-ness'. Now before any US readers get all offended by my statement, let me clarify - I certainly don't dislike Americans or their books as a blanket rule, but being so far away geographically can have its problems when using US published recipes. Not so much because of the different measurement systems (there are charts to help with that if you're unsure), more because a lot of commonly used US-brand-name ingredients are unavailable here, and it's not always straightforward to substitute something if you don't know what the specified ingredient is similar to. And herein lay my problem with Yockelson's book; there are pages (and pages and pages) of meticulously compiled charts and lists at the beginning of the book detailing chocolate-based ingredients, their sale weights and characteristics, but unfortunately most of the ingredients aren't available in Australia (excepting some of the major European brands). You see my dilemma.

Having made my complaint, though, I read on and decided that this was still a book worth owning. The recipes are detailed and there are A LOT of them, covering just about any chocolate-themed baked good you can think of; most recipes have a photo; and when it comes down to it, it's just chocolate - pick a good quality version that you know you like, and it's more than likely to be a reasonable substitute. Oh, and the layout and design, though a bit flowery and flouncy, really suits the writing style and content (sounds simple but so often I come across a cookbook where this is really not the case, so it's worth mentioning the good ones).

So, the recipe.

On close inspection, there were several things I wanted to make, but these Rocky Road Mud Bars won out on the basis of pantry supplies and Chris' insistence that they were the best looking in the picture. And, apart from the Oreo crumb layer on the bottom, which could really be left out altogether next time (it didn't add much in terms of flavour/texture in my opinion, although I'll admit I've never been an Oreos fan), they really are pretty good. And I followed Yockelson's recommendation of chopping up extra nuts, chocolate and marshmallows and scattering these over the top of the mixture about 5 minutes before the end of baking. Definitely a worthy addition.

Rocky Road Mud Bars
from Chocolate Chocolate (Lisa Yockelson)

Chocolate Cookie Layer:
1 stick (125g) unsalted butter, melted and cooled to tepid
1 1/2 cups plus 3 tablespoons (way too hard to figure out, I just used one packet) chocolate sandwich cookie crumbs (such as crumbs made from Oreo Cookies)

Mud Brownie Batter:
1 1/4 cups bleached cake flour (plain white flour did the trick for me)
1/4 cup unsweetened alkalised cocoa powder (PLEASE use something good, my preferred brand is Barry Cocoa, but anything reasonable and Dutch will do)
1/4 tsp baking powder
1/8 tsp salt
3/4 cup semisweet chocolate chips (I used 60% buttons, roughly chopped)
2 sticks (250g) unsalted butter, melted and cooled to tepid
6 ounces (180g) unsweetened chocolate, melted and cooled to tepid (again, 60% buttons)
5 large eggs
2 cups caster sugar
2 tsp vanilla extract (I used paste)
1 cup chopped walnuts (pecans)
1/3 cup miniature marshmallows

Preheat oven t0 325F (about 160C). Grease and line a 10x10inch pan (mine was about 26 x 22cm and made a pretty deep brownie).

Mix the cookie layer: pour the melted butter into the pan. Sprinkle the chocolate cookie crumbs evenly over the melted butter. Press down on the crumbs with the underside of an offset spatula so the crumbs absorb the butter. Bake the cookie layer for 4 minutes, then let stand on a cooling rack for 10 minutes.

Mix the batter: Sift flour, cocoa, baking powder and salt. In a small bowl toss the chocolate chips with 1/2 tsp of the sifted mixture (this will help prevent them from sinking to the bottom of the finished brownies).
Whisk the melted butter and melted chocolate in a medium-sized bowl until smooth. In a large bowl, whisk the eggs for 1 minute to blend, add the sugar and whisk for a further minute or until just incorporated. Blend in the melted butter/chocolate mixture, mixing thoroughly. Blend in the vanilla. Sift the flour mixture over and slowly stir in. Blend in the chocolate chips, walnuts and marshmallows.
Spoon the batter in large dollops onto the cookie crumb layer. Carefully spread the batter over the cookie layer using a flexible spatula.

Bake, cool, refrigerate and cut the sweet: Bake for 40 minutes or until set (don't overbake it, whatever you do - you want it still a bit gooey in the centre when tested with a skewer). Cool completely in the pan. Refrigerate for 1 hour, or until firm enough to cut neatly. With a small sharp knife, cut into quarters, then each quarter into 6 bars. Store in an airtight tin.

Bake and serve within 3 days (although we ate the last of them 6-7 days after baking and they were still ok).